

1.Ansible是什么?
ansible是新出现的自动化运维工具,通过一个命令完成一系列的操作,进而能减少重复性的工作和维护成本!基于Python开发,集合了众多运维工具(puppet、chef、func、fabric)的优点,实现了批量系统配置、批量程序部署、批量运行命令等功能。
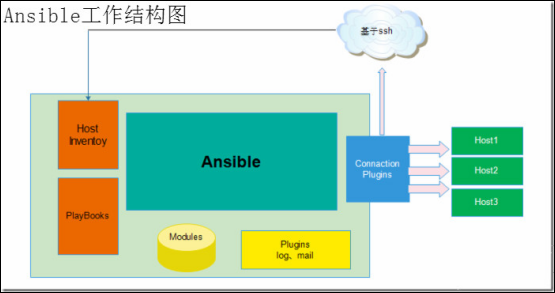
ansible是基于 paramiko 开发的,并且基于模块化工作,本身没有批量部署的能力。真正具有批量部署的是ansible所运行的模块,ansible只是提供一种框架。ansible不需要在远程主机上安装client/agents,因为它们是基于ssh来和远
程主机通讯的。ansible目前已经已经被红帽官方收购,是自动化运维工具中大家认可度最高的,并且上手容易,学习简单。是每位运维工程师必须掌握的技能之一。
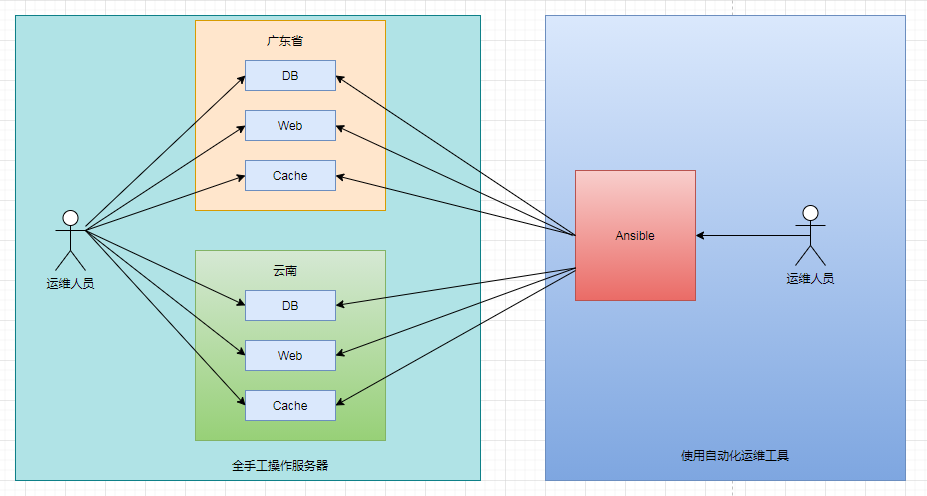
曾经有媒体报道,Facebook一个运维人员管理上万台服务器,如果使用手工方法去维护是很难做到的,基于自动化工具就可以轻松管理上万台,甚至十万台服务器,如图:
简单说就是为了更高效工作,就有了Ansible,一款自动化运维工具,通过一个命令完成一系列的操作,进而能减少重复性的工作和维护成本!
2.Ansible工具的优势
2.1 源码是Python
因为Python是Linux的标配,一般Linux中都默认自带了Python版本,所以安装Ansible不需要太多的依赖,其中大名鼎鼎的宝塔就是Python所写.所以只需要安装服务器端就可以.
2.2 通过SSH协议来进行通讯
因为SSH协议也是标准的Linux下安全访问协议.所以在Ansible服务器和客户端通讯中默认情况下不需要做特殊处理.通讯方式一般是用密码或者是SSH的免密登陆.比较方便使用.
2.3 通过推送方式管理客户端
利用推送方式对客户端系统加以配置,这样所有的工作都可在主服务器端完成,客户端不用轮询获取服务端的命令,这样就会使得性能相对于比较高.
2.4 去中心化管理
每个客户端都没有规定服务器,也就是说每个服务器管理的客户端只要有ssh协议支持,就可以完全操作,这样降低了服务器和客户端的耦合度.拓扑图如下:
3安装
3.1 安装需求
Ansible 可以工作在Linux,BSD,Mac OS X等平台,对Python环境的要求最低为Python2.6以上,如果你的操作系统Python软件版本为2.4,需要升级方可使用Ansible工具.
3.2 安装命令
Red Hat,CentOS操作系统可以直接基于yum工具自动安装ansible,CentOS6.x或者CentOS7.x安装前,需要先安装epel扩展源.
安装epel扩展源,命令如下:提供一些官方没有提供的常见的使用工具类
yum install epel-release -yyum install epel-release -yyum install epel-release -y
安装后,可以直接安装Ansible
yum install ansible -yyum install ansible -yyum install ansible -y
因为Ansible是python所写,也可以用Python的包管理器pip来安装,但这种方式比较复杂,兼容性也没有epel提供的包好,所以一般建议使用yum来安装.
3.3 安装目录
安装以后默认配置文件目录为/etc/ansible,可执行文件目录为/usr/bin/ansible
3.3.1 配置文件目录/etc/ansible
这个目录是ansible的配置目录,它里面所有的配置都在此目录下.各个目录文件如下:
|
文件名
|
作用
|
格式
|
备注
|
|
ansible.cfg
|
是ansible的核心配置文件
|
默认是ini格式
|
Ansible所有的配置都找这个文件
|
|
hosts
|
所有服务器配置文件
|
默认是ini格式
|
所有本地和远程服务器的配置
|
|
roles
|
角色
|
文件夹
|
对于一些常见功能的复用
|
3.3.2 可执行文件/usr/bin/ansible
默认是在系统的usr/bin下,做了一个软连接,其实真正的安装目录是/usr/bin/ansible-2.7
/usr/bin/ansible–>/usr/bin/ansible-2.7
3.4 重点配置文件说明
3.4.1 hosts默认文件
在/etc/ansible下的hosts文件是配置当前Ansible执行命令的主机列表,所有管理的主机默认都在此文件中配置,当然如果服务器主机非常多的情况下,这个文件也可以分为多个文件.
hosts文件是ini格式文件,此文件是早期windows下定义的配置文件,一般是由组名和变量来组成.用#号做注释,简单点的ini文件格式如下:
[组名]变量名1变量名2# 注释[组名]

变量名1

变量名2

# 注释[组名]

变量名1

变量名2

# 注释
下面是自带的hosts文件,格式如下:
# This is the default ansible 'hosts' file.## It should live in /etc/ansible/hosts## - Comments begin with the '#' character# - Blank lines are ignored# - Groups of hosts are delimited by [header] elements# - You can enter hostnames or ip addresses# - A hostname/ip can be a member of multiple groups# Ex 1: Ungrouped hosts, specify before any group headers.## green.example.com## blue.example.com## 192.168.100.1## 192.168.100.10# Ex 2: A collection of hosts belonging to the 'webservers' group## [webservers]## alpha.example.org## beta.example.org## 192.168.1.100## 192.168.1.110# If you have multiple hosts following a pattern you can specify# them like this:## www[001:006].example.com# Ex 3: A collection of database servers in the 'dbservers' group## [dbservers]#### db01.intranet.mydomain.net## db02.intranet.mydomain.net## 10.25.1.56## 10.25.1.57# Here's another example of host ranges, this time there are no# leading 0s:## db-[99:101]-node.example.com# This is the default ansible 'hosts' file. # # It should live in /etc/ansible/hosts # # - Comments begin with the '#' character # - Blank lines are ignored # - Groups of hosts are delimited by [header] elements # - You can enter hostnames or ip addresses # - A hostname/ip can be a member of multiple groups # Ex 1: Ungrouped hosts, specify before any group headers. ## green.example.com ## blue.example.com ## 192.168.100.1 ## 192.168.100.10 # Ex 2: A collection of hosts belonging to the 'webservers' group ## [webservers] ## alpha.example.org ## beta.example.org ## 192.168.1.100 ## 192.168.1.110 # If you have multiple hosts following a pattern you can specify # them like this: ## www[001:006].example.com # Ex 3: A collection of database servers in the 'dbservers' group ## [dbservers] ## ## db01.intranet.mydomain.net ## db02.intranet.mydomain.net ## 10.25.1.56 ## 10.25.1.57 # Here's another example of host ranges, this time there are no # leading 0s: ## db-[99:101]-node.example.com# This is the default ansible 'hosts' file. # # It should live in /etc/ansible/hosts # # - Comments begin with the '#' character # - Blank lines are ignored # - Groups of hosts are delimited by [header] elements # - You can enter hostnames or ip addresses # - A hostname/ip can be a member of multiple groups # Ex 1: Ungrouped hosts, specify before any group headers. ## green.example.com ## blue.example.com ## 192.168.100.1 ## 192.168.100.10 # Ex 2: A collection of hosts belonging to the 'webservers' group ## [webservers] ## alpha.example.org ## beta.example.org ## 192.168.1.100 ## 192.168.1.110 # If you have multiple hosts following a pattern you can specify # them like this: ## www[001:006].example.com # Ex 3: A collection of database servers in the 'dbservers' group ## [dbservers] ## ## db01.intranet.mydomain.net ## db02.intranet.mydomain.net ## 10.25.1.56 ## 10.25.1.57 # Here's another example of host ranges, this time there are no # leading 0s: ## db-[99:101]-node.example.com
上述配置对各种服务器都进行了Demo配置,都是注释,如果要使用ansible,至少要配置一个主机才可以运行.如下:
[local]192.168.19.3master[local]

192.168.19.3

master[local]

192.168.19.3

master
3.4.2 快速测试服务器命令
使用ping模块,可以在返回值中看到所有ping服务器的返回值
ansible all -m pingansible all -m pingansible all -m ping
3.4.3 hosts 文件语法特性
3.4.3.1 多主机匹配模式
如果多个主机有相同的序列,比如1-100,a-e类似的主机名,那么就可以用序列的语法去定义主机,可以避免去繁琐重复的定义主机.比如要定义web开通的1-10号服务器,在hosts文件中语法如下:
[fdweb]www[01:10].fd.com# 配置十台服务器,主机名是从www01.fd.com到www10.fd.com[fdweb] www[01:10].fd.com # 配置十台服务器,主机名是从www01.fd.com到www10.fd.com[fdweb] www[01:10].fd.com # 配置十台服务器,主机名是从www01.fd.com到www10.fd.com
小技巧:如果只想看到ansible执行的服务器名,不想真的执行,那么可以用--list参数,可以查看当次执行的主机名.
使用–list的效果如下:
[root@master ~]# ansible fdweb -m ping --listhosts (10):www01.fd.comwww02.fd.comwww03.fd.comwww04.fd.comwww05.fd.comwww06.fd.comwww07.fd.comwww08.fd.comwww09.fd.comwww10.fd.com[root@master ~]# ansible fdweb -m ping --list hosts (10): www01.fd.com www02.fd.com www03.fd.com www04.fd.com www05.fd.com www06.fd.com www07.fd.com www08.fd.com www09.fd.com www10.fd.com[root@master ~]# ansible fdweb -m ping --list hosts (10): www01.fd.com www02.fd.com www03.fd.com www04.fd.com www05.fd.com www06.fd.com www07.fd.com www08.fd.com www09.fd.com www10.fd.com
同样数字序列也可以改为字母序列,比如下面语法:
[fddb]db[a:f].fd.com[fddb]

db[a:f].fd.com[fddb]

db[a:f].fd.com
3.4.3.2 定义主机别名和参数
如果要定义多台主机属于同一个服务器,或者要给服务器去个自定义的名称,那么可以在hosts文件中对主机进行别名的定义,简单如下:
[proserver]webServer ansible_ssh_host=192.168.19.3 ansible_ssh_port=22dbServer ansible_ssh_host=192.168.19.3 ansible_ssh_port=22staticServer ansible_ssh_host=192.168.19.3 ansible_ssh_port=22[proserver]

webServer ansible_ssh_host=192.168.19.3 ansible_ssh_port=22

dbServer ansible_ssh_host=192.168.19.3 ansible_ssh_port=22

staticServer ansible_ssh_host=192.168.19.3 ansible_ssh_port=22[proserver]

webServer ansible_ssh_host=192.168.19.3 ansible_ssh_port=22

dbServer ansible_ssh_host=192.168.19.3 ansible_ssh_port=22

staticServer ansible_ssh_host=192.168.19.3 ansible_ssh_port=22
上面定义为一台服务器定义了三个别名,以及不同的端口号和主机ip,上面的属性名中间带有ssh这个是老版本的语法,意思是只能通过ssh协议来处理交互.
但是在最新版本的ansible中支持对Windows服务器的批量管理,在Windows客户端管理中使用的不是ssh协议,所以ansible2.0以后,将ansible_ssh_host,ansible_ssh_port,ansible_ssh_user等,简写成了ansible_host,ansible_port,ansible_user,上面的定义可以修改为如下:
[proserver]webServer ansible_host=192.168.19.3 ansible_port=22dbServer ansible_host=192.168.19.3 ansible_port=22staticServer ansible_host=192.168.19.3 ansible_port=22[proserver]

webServer ansible_host=192.168.19.3 ansible_port=22

dbServer ansible_host=192.168.19.3 ansible_port=22

staticServer ansible_host=192.168.19.3 ansible_port=22[proserver]

webServer ansible_host=192.168.19.3 ansible_port=22

dbServer ansible_host=192.168.19.3 ansible_port=22

staticServer ansible_host=192.168.19.3 ansible_port=22
常见参数为:
ansible_ssh_host                    # 目标主机地址ansible_ssh_port                    # 目标主机端口,默认22ansible_ssh_user                    # 目标主机用户ansible_ssh_pass                    # 目标主机ssh密码ansible_sudo_pass                   # sudo密码ansible_ssh_host                    # 目标主机地址

ansible_ssh_port                    # 目标主机端口,默认22

ansible_ssh_user                    # 目标主机用户

ansible_ssh_pass                    # 目标主机ssh密码

ansible_sudo_pass                   # sudo密码ansible_ssh_host                    # 目标主机地址

ansible_ssh_port                    # 目标主机端口,默认22

ansible_ssh_user                    # 目标主机用户

ansible_ssh_pass                    # 目标主机ssh密码

ansible_sudo_pass                   # sudo密码
4. Ansible命令语法
经典命令语法参数如下:
ansible 主机匹配模式 -m 模块名 -a 参数ansible 主机匹配模式 -m 模块名 -a 参数ansible 主机匹配模式 -m 模块名 -a 参数
注意:上述命令默认是通过ssh跟被管理的主机通讯,那么意味着当前宿主机必须可以通过ssh成功访问被管理的主机(服务器),有两种方式,一种是通过输入账号密码,另一种是免密登陆.
1. 账号密码登陆
ansible 主机匹配模式 -k -m 模块名ansible 主机匹配模式 -k -m 模块名ansible 主机匹配模式 -k -m 模块名
这时候执行的时候,服务器会提示你输入账号密码,登陆了才能执行,否则就跑权限问题
2.免密登陆
如果被管理的服务器要经常操作,那么输入密码比较繁琐,这时候就要通过设置本机对被管理服务器的免密登陆才可以:
# 设置免密登陆简单快速步骤# 1.生成本地的秘钥ssh-keygen -t rsa# 2.把当前执行目录切换到用户根目录cd ~# 3.把生成的秘钥拷贝到需要远程登陆的被管理的服务器(如果端口号不是22,通过-p指定ssh的端口号)ssh-copy-id root@slave1 -p 8888# 4.在接下来的系统提示中输入密码,即可# 设置免密登陆简单快速步骤 # 1.生成本地的秘钥 ssh-keygen -t rsa # 2.把当前执行目录切换到用户根目录 cd ~ # 3.把生成的秘钥拷贝到需要远程登陆的被管理的服务器(如果端口号不是22,通过-p指定ssh的端口号) ssh-copy-id root@slave1 -p 8888 # 4.在接下来的系统提示中输入密码,即可# 设置免密登陆简单快速步骤 # 1.生成本地的秘钥 ssh-keygen -t rsa # 2.把当前执行目录切换到用户根目录 cd ~ # 3.把生成的秘钥拷贝到需要远程登陆的被管理的服务器(如果端口号不是22,通过-p指定ssh的端口号) ssh-copy-id root@slave1 -p 8888 # 4.在接下来的系统提示中输入密码,即可
问题:如果已经存在远程主机的秘钥,或者无法重新生成远程主机的秘钥,先删除根目录下的.ssh文件夹,,重新执行上面的命令即可.
复杂命令参数(可参考):
-v,–verbose             打印详细模式;-i PATH,–inventory=PATH       指定host文件路径;-f NUM,–forks=NUM         指定fork开启同步进程的个数,默认5;-m NAME,–module-name=NAME     指定module名称,默认模块command;-a MODULE_ARGS          module模块的参数或者命令;-k,–ask-pass            输入远程被管理端密码;–sudo                 基于sudo用户执行;-K,–ask-sudo-pass           提示输入sudo密码与sudo一起使用;-u USERNAME,–user=USERNAME  指定移动端的执行用户;-C,–check               测试执行过程,不改变真实内容,相当于预演;-T TIMEOUT,             执行命令超时时间,默认为10秒;--version               查看Ansible软件版本信息。-v,–verbose             打印详细模式;

-i PATH,–inventory=PATH       指定host文件路径;

-f NUM,–forks=NUM         指定fork开启同步进程的个数,默认5;

-m NAME,–module-name=NAME     指定module名称,默认模块command;

-a MODULE_ARGS          module模块的参数或者命令;

-k,–ask-pass            输入远程被管理端密码;

–sudo                 基于sudo用户执行;

-K,–ask-sudo-pass           提示输入sudo密码与sudo一起使用;

-u USERNAME,–user=USERNAME  指定移动端的执行用户;

-C,–check               测试执行过程,不改变真实内容,相当于预演;

-T TIMEOUT,             执行命令超时时间,默认为10秒;

--version               查看Ansible软件版本信息。-v,–verbose             打印详细模式;

-i PATH,–inventory=PATH       指定host文件路径;

-f NUM,–forks=NUM         指定fork开启同步进程的个数,默认5;

-m NAME,–module-name=NAME     指定module名称,默认模块command;

-a MODULE_ARGS          module模块的参数或者命令;

-k,–ask-pass            输入远程被管理端密码;

–sudo                 基于sudo用户执行;

-K,–ask-sudo-pass           提示输入sudo密码与sudo一起使用;

-u USERNAME,–user=USERNAME  指定移动端的执行用户;

-C,–check               测试执行过程,不改变真实内容,相当于预演;

-T TIMEOUT,             执行命令超时时间,默认为10秒;

--version               查看Ansible软件版本信息。
4.1 主机匹配模式
默认在执行ansible命令的时候,主机匹配模式是hosts文件中的组名,但是也可以用all或者’*’代表所有主机名,比如’*r’就可以匹配master主机.
4.1.1 通配符模式
可以用*字符串通配符模式来使用
ansible '*r' -m pingansible '*r' -m pingansible '*r' -m ping
4.1.2 使用所有主机匹配模式
可以使用all或者加引号’*’表示hosts文件中所有的主机.
4.1.3 去服务器的并集
可以通过获取两个组里面所有的主机,并且进行命令的执行
假设hosts文件中内容如下:
[local]192.168.19.3masterfdfd.ok[remote]netke.top[db]masternetke.top[local]
192.168.19.3
master
fdfd.ok

[remote]
netke.top

[db]
master
netke.top[local]
192.168.19.3
master
fdfd.ok

[remote]
netke.top

[db]
master
netke.top
下来获取local和db分组的并集,并且执行命令.
ansible 'local:db' -m pingansible 'local:db' -m pingansible 'local:db' -m ping
那么就可以看出结果为local和db分组的并集:
fdfd.ok | UNREACHABLE! => {"changed": false,"msg": "Failed to connect to the host via ssh: ssh: Could not resolve hostname fdfd.ok: Name or service not known","unreachable": true}master | UNREACHABLE! => {"changed": false,"msg": "Failed to connect to the host via ssh: Permission denied (publickey,gssapi-keyex,gssapi-with-mic,password).","unreachable": true}dbd.fd.com | UNREACHABLE! => {"changed": false,"msg": "Failed to connect to the host via ssh: ssh: Could not resolve hostname dbd.fd.com: Name or service not known","unreachable": true}dbf.fd.com | UNREACHABLE! => {"changed": false,"msg": "Failed to connect to the host via ssh: ssh: Could not resolve hostname dbf.fd.com: Name or service not known","unreachable": true}dba.fd.com | UNREACHABLE! => {"changed": false,"msg": "Failed to connect to the host via ssh: ssh: Could not resolve hostname dba.fd.com: Name or service not known","unreachable": true}dbc.fd.com | UNREACHABLE! => {"changed": false,"msg": "Failed to connect to the host via ssh: ssh: Could not resolve hostname dbc.fd.com: Name or service not known","unreachable": true}dbb.fd.com | UNREACHABLE! => {"changed": false,"msg": "Failed to connect to the host via ssh: ssh: Could not resolve hostname dbb.fd.com: Name or service not known","unreachable": true}dbe.fd.com | UNREACHABLE! => {"changed": false,"msg": "Failed to connect to the host via ssh: ssh: Could not resolve hostname dbe.fd.com: Name or service not known","unreachable": true}fdfd.ok | UNREACHABLE! => { "changed": false, "msg": "Failed to connect to the host via ssh: ssh: Could not resolve hostname fdfd.ok: Name or service not known", "unreachable": true } master | UNREACHABLE! => { "changed": false, "msg": "Failed to connect to the host via ssh: Permission denied (publickey,gssapi-keyex,gssapi-with-mic,password).", "unreachable": true } dbd.fd.com | UNREACHABLE! => { "changed": false, "msg": "Failed to connect to the host via ssh: ssh: Could not resolve hostname dbd.fd.com: Name or service not known", "unreachable": true } dbf.fd.com | UNREACHABLE! => { "changed": false, "msg": "Failed to connect to the host via ssh: ssh: Could not resolve hostname dbf.fd.com: Name or service not known", "unreachable": true } dba.fd.com | UNREACHABLE! => { "changed": false, "msg": "Failed to connect to the host via ssh: ssh: Could not resolve hostname dba.fd.com: Name or service not known", "unreachable": true } dbc.fd.com | UNREACHABLE! => { "changed": false, "msg": "Failed to connect to the host via ssh: ssh: Could not resolve hostname dbc.fd.com: Name or service not known", "unreachable": true } dbb.fd.com | UNREACHABLE! => { "changed": false, "msg": "Failed to connect to the host via ssh: ssh: Could not resolve hostname dbb.fd.com: Name or service not known", "unreachable": true } dbe.fd.com | UNREACHABLE! => { "changed": false, "msg": "Failed to connect to the host via ssh: ssh: Could not resolve hostname dbe.fd.com: Name or service not known", "unreachable": true }fdfd.ok | UNREACHABLE! => { "changed": false, "msg": "Failed to connect to the host via ssh: ssh: Could not resolve hostname fdfd.ok: Name or service not known", "unreachable": true } master | UNREACHABLE! => { "changed": false, "msg": "Failed to connect to the host via ssh: Permission denied (publickey,gssapi-keyex,gssapi-with-mic,password).", "unreachable": true } dbd.fd.com | UNREACHABLE! => { "changed": false, "msg": "Failed to connect to the host via ssh: ssh: Could not resolve hostname dbd.fd.com: Name or service not known", "unreachable": true } dbf.fd.com | UNREACHABLE! => { "changed": false, "msg": "Failed to connect to the host via ssh: ssh: Could not resolve hostname dbf.fd.com: Name or service not known", "unreachable": true } dba.fd.com | UNREACHABLE! => { "changed": false, "msg": "Failed to connect to the host via ssh: ssh: Could not resolve hostname dba.fd.com: Name or service not known", "unreachable": true } dbc.fd.com | UNREACHABLE! => { "changed": false, "msg": "Failed to connect to the host via ssh: ssh: Could not resolve hostname dbc.fd.com: Name or service not known", "unreachable": true } dbb.fd.com | UNREACHABLE! => { "changed": false, "msg": "Failed to connect to the host via ssh: ssh: Could not resolve hostname dbb.fd.com: Name or service not known", "unreachable": true } dbe.fd.com | UNREACHABLE! => { "changed": false, "msg": "Failed to connect to the host via ssh: ssh: Could not resolve hostname dbe.fd.com: Name or service not known", "unreachable": true }
4.1.4 取服务器的交集
需求:需要在本地数据库服务器上去执行命令,那么就是在local分组和db分组中取得交集,命令如下:
ansible 'local:&db' -m pingansible 'local:&db' -m pingansible 'local:&db' -m ping
4.1.5 去服务器的非
需求:需要执行本地但是要排除不是数据库服务器的命令,那就是属于local但是不属于db的服务器上执行命令:
ansible 'local:!db' -m pingansible 'local:!db' -m pingansible 'local:!db' -m ping
4.1.6 交集,并集,非一起使用
可以按照需求对上述命令进行合并使用:
ansible 'local:db:&remote' -m pingansible 'local:db:&remote' -m pingansible 'local:db:&remote' -m ping
4.2 模块名
4 本站一切资源不代表本站立场,并不代表本站赞同其观点和对其真实性负责。
5 本站一律禁止以任何方式发布或转载任何违法的相关信息,访客发现请向站长举报。
6 本站资源大多存储在云盘,如发现链接失效,请联系我们我们会第一时间更新。


暂无评论内容